angular schematics 101 :基本内容说明
基础三问:angular schematics 是什么?有什么用?怎么用?
angular schematics 是什么?
首先要知道什么是 schematics(原理图):
angular 官方文档说明:
①: 原理图是一个基于模板的支持复杂逻辑的代码生成器。它是一组通过生成代码或修改代码来转换软件项目的指令。 原理图会打包成集合(collection)并用 npm 安装。
②: 原理图的集合可以作为一个强大的工具,以创建、修改和维护任何软件项目,特别是当要自定义 Angular 项目以满足你自己组织的特定需求时。例如,你可以借助原理图来用预定义的模板或布局生成常用的 UI 模式或特定的组件。你也可以使用原理图来强制执行架构规则和约定,让你的项目保持一致性和互操作性。
所以 简单来讲,angular schematics 就是 angular 生态圈中,针对 angular 项目的代码生成器。
所以 angular schematics 只是模板代码生成器?
不可否则,schematics 最主要的作用就是代码生成器.有很多模板代码结构内容都是一样的,例如 component,每次新建一个 component,都需要复制上一份的代码进行修改.
angular-cli 默认有一些可以按照模板生成的组件,例如 componet、router、service、interceptor 等等,这也是很多插件工具一键生成模板代码的依据。但是并不是所有代码都适合所有开发者。例如有些使用者常与 CURD 打交道,所以希望生成的 service 直接包含所有的 CRUD 函数,输入不同的名称对应生成不同产品。等等各自自适应、自构建的模板。
除此之外,它还能用于按照一定规则修改程式代码、快速按照所需模块等,就如引用的 angular 官方文档说明的第 ② 点。毕竟至少对应到了 ng generate 、 ng add 和 ng update 指令。
简单上手 angular schematics:创建一个 hello
1、全局安装 schematics cli(需要 node 6.9 以上版本)
npm install -g @angular-devkit/schematics-cli安装完成之后,可以在终端输入schmatics命令,能显示 schematics 的指令说明则表示安装成功。
2、创建一个空的原理图
schematics blank --name=hello生成的原理图中基本内容结构可参看官网说明集合的内容和命名原理图
简单说明如下: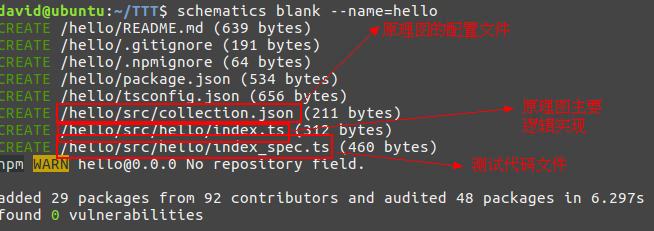
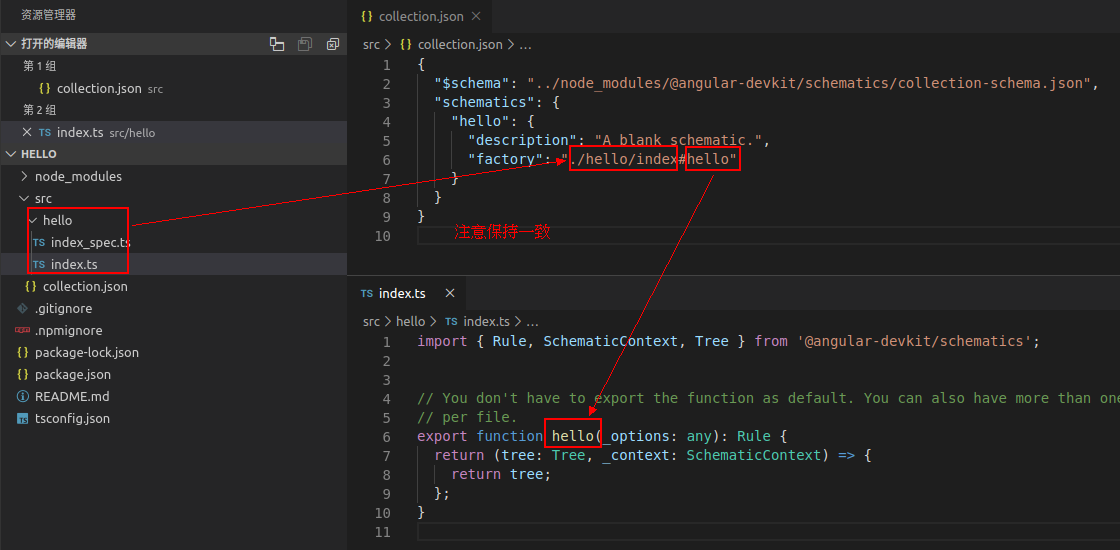
collection.json 配置一般一个原理图就只配置一次,所以大部分内容都是在 index.ts 中实现,所以,一定先清楚这个文件的内容:
具体可以参看官方说明原理图的概念
简单说明如下: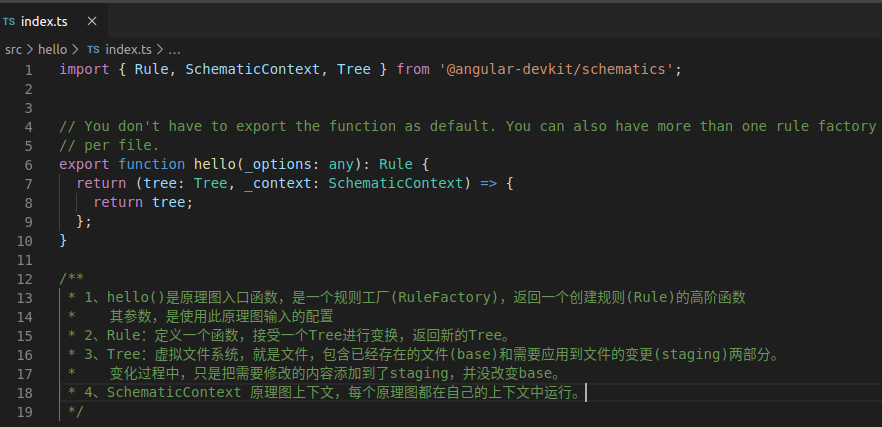
3、运行原理图
因为创建的是一个空白原理图,运行是不会有任何输出显示的。
3.1 在当前位置运行:
先构建:
npm run build再运行
schematics .:hello简单说明:
ts 代码在编译之后转换成 js 代码才能运行,在原理图中,在执行npm run build之后,
会出现其他的 XXX.d.ts、XXX.js、XXX.js.map。
运行时,.:hello的.是当前位置,hello则是在 collection.json 中配置的原理图的名字。
当然,一份 collection.json 中可以配置多个原理图,所以要指定使用的是哪一个。
“Nothing to be done.”显然没有任何意义,我们可以在 index.ts 中加入一句打印,看看效果:
export function hello(_options: any): Rule {
  return (tree: Tree, _context: SchematicContext) => {
    console.log("hello");
    return tree;
  };
}
那么再次编译运行之后,就可以看到输入的是:
david@ubuntu:~/TTT/hello$ schematics .:hello
hello
Nothing to be done.
david@ubuntu:~/TTT/hello$
3.2 在相对路劲下运行
如果现在不在 hello 下运行了,那么就不能直接.:
例如在 hello 同级目录下新建个 test 文件夹,在 test 中运行则是:
david@ubuntu:~/TTT/test$ schematics ../hello/src/collection.json:hello
hello
Nothing to be done.
david@ubuntu:~/TTT/test$
以上就是 angular schematics 的基础说明和运行,是不是毫无实际意义?没错。接下来,我们开始进入有点实际作用的内容。
angular schematics 实现 ng generator 使用模板生成组件
本节会实现,在 angular 项目中,使用 ng generator 指令生成一个通用的 component 组件,和一般向后台请求数据需要包含 CRUD 函数的 service 组件。here we go。
准备工作
新建一个空白 schematics,如下:
schematics blank --name=angular-schematics-tutorial将原本的内容:
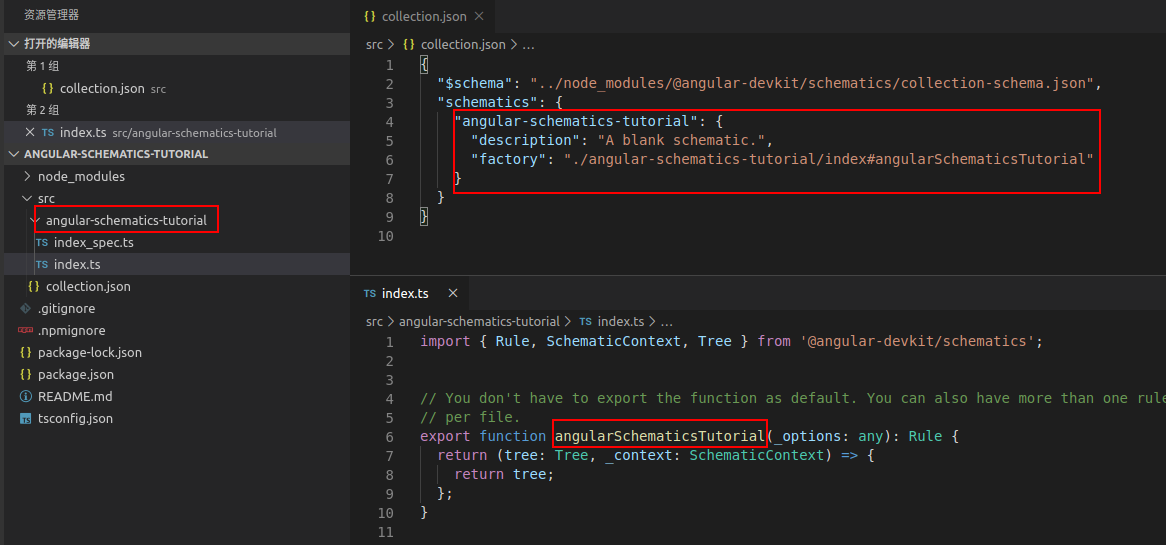
修改为:

为了方便,不用每次修改都运行 build,在此项目的 package.json 的 script 加入一行:
"build:watch": "tsc -p tsconfig.json --watch"使得该项目一致在 watch 状态下,然后运行
npm run build:watch准备工作完成,进入正题。
实现创建通用 component 组件
一般每个命令原理图都包含以下内容:
index.ts: 定义命名原理图中转换逻辑的代码。
schema.json: 原理图变量定义。
schema.d.ts: 原理图变量。
files/: 要复制的可选组件/模板文件。
我们的也不例外。
创建 component 文件模板 template
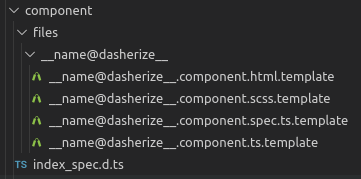
一般 angular component 会包含 4 个文件:XXX.html,XXX.scss,XXX.spec.ts,XXX.ts。所以,先准备好这些模板。
在/component 文件夹下新建 files 文件夹,并创建以下 4 个文件,效果如下:
简单说明两个函数:
classify() 方法接受一个值,并返回标题格式(title case)的值。比如,如果提供的名字是 my service,它就会返回 MyService。
dasherize() 方法接受一个值,并以中线分隔并小写的形式返回值。比如,如果提供的名字是 MyService,它就会返回 “my-service” 的形式。
此 component 模块的效果就是,在新建一个 component 时,输入 component 的名字,例如 apple,则会在该 angular 项目的 src/app/下,新建一个文件夹 apple,下面 4 个文件 apple.component.html, apple.component.scss,apple.component.spec.ts,apple.component.ts。
模板内容分别如下:__name@dasherize__.component.html.template文件:
<%= dasherize(name) %> works!
__name@dasherize__.component.spec.ts.template文件:
/* tslint:disable:no-unused-variable */
import { async, ComponentFixture, TestBed } from '@angular/core/testing';
import { By } from '@angular/platform-browser';
import { DebugElement } from '@angular/core';

import { <%= classify(name) %>Component } from './<%= dasherize(name) %>.component';

describe('<%= classify(name) %>Component', () => {
  let component: <%= classify(name) %>Component;
  let fixture: ComponentFixture<<%= classify(name) %>Component>;

  beforeEach(async(() => {
    TestBed.configureTestingModule({
      declarations: [<%= classify(name) %>Component]
    })
      .compileComponents();
  }));

  beforeEach(() => {
    fixture = TestBed.createComponent(<%= classify(name) %>Component);
    component = fixture.componentInstance;
    fixture.detectChanges();
  });

  it('should create', () => {
    expect(component).toBeTruthy();
  });
});
__name@dasherize__.component.ts.template文件:
import { Component, OnInit } from '@angular/core';

@Component({
  selector: 'app-<%= dasherize(name) %>',
  templateUrl: './<%= dasherize(name) %>.component.html',
  styleUrls: ['./<%= dasherize(name) %>.component.scss']
})
export class <%=classify(name)%>Component implements OnInit {

  constructor() { }

  ngOnInit() {
  }
}
scss 部分就没有必要了。
此部分内容,可参考 angular-cli 源代码内容:angular-cli component 组件模板
配置 schema.json,定义该原理图可用选项
在 component 文件夹下新建 schema.json,并输入以下内容:
{
    "$schema": "http://json-schema.org/schema",
    "id": "componentSchema",
    "title": "component options schema.",
    "type": "object",
    "descripiton": "创建一个component范本",
    "properties": {
        "name": {
            "description": "component的名字.",
            "type": "string",
            "$default": {
                "$source": "argv",
                "index": 0
            },
            "x-prompt": "你想创建的component的名字:"
        }
    },
    "required": [
        "name"
    ]
}
属性说明:
id:这个模式定义在集合中的唯一 id。
title:一个人类可读的模式描述。
type:由这些属性提供的类型描述符。
properties:一个定义该原理图可用选项的对象。
required:必填的选项
注意属性(proerties)选项:
$default 的设定,上面的表示,如果没有指定输入的选项,那么输入的第一个就是 name
x-prompt:如果没有输入选项,则提示语提示输入
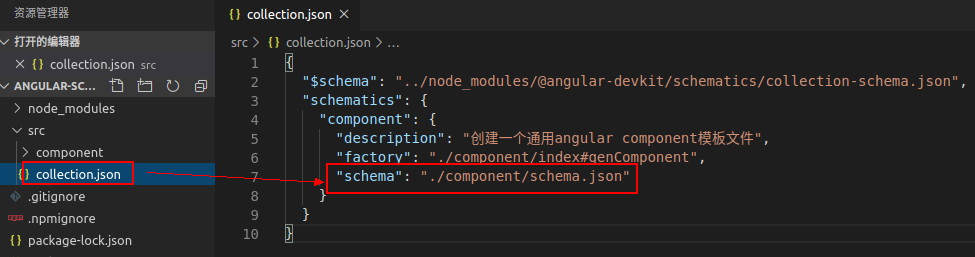
创建好 schema.json 之后,一定要记得在 collection.json 中配置 schema 属性
创建 schema.d.ts,定义的各个选项的值
一般的,可以手动创建 schema.d.ts,如本生成 component 的原理图,它的 schema.json 中属性只有一个必填的 name,那么编写的 schema.d.ts 内容就如下:
export interface Schema {
    name: string;
}
实际上,这个文件可以使用指令生成,在 schema.json 的同级目录下,开启终端输入指令,如下:
npx -p dtsgenerator dtsgen schema.json -o schema.d.ts效果如下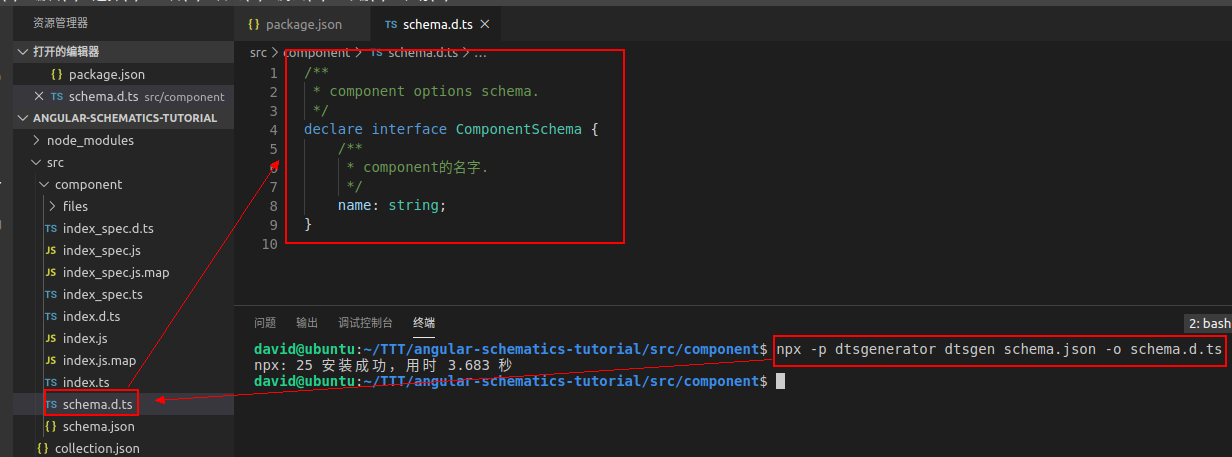
但注意,生成之后把 declare 改成 export,因为需要把这接口导出使用。
编写规则工厂逻辑代码
以上都定义完之后,便到了最重要的环节,编写逻辑代码实现 componet 组件的生成。
简单分析,至少我们有以下几步工作需要完成:
第一步:判断目标项目是不是 angular 项目。如果不在 angular 项目中去生成 angular 的 componet,那就没什么意义。这一步可以提出来通用。
同理,@schematics 对 angular 有很多的已有支持,我们这里可以用到一些便捷的方法,所以需要先安装@schematics/angular,输入指令如下:
npm install @schematics/angular -S第二步:读取预设的模板 template 文件,并将使用者输入选项应用到模板。
第三步:合并模板文件,返回新的 tree。
修改 index.ts 代码具体如下:
import {
  Rule, SchematicContext, Tree,
  apply, mergeWith, url,
  move,
  applyTemplates, SchematicsException
} from '@angular-devkit/schematics';
import { strings } from '@angular-devkit/core';

import { ComponentSchema as Schema } from './schema'

import { buildDefaultPath } from '@schematics/angular/utility/project';
import { parseName } from '@schematics/angular/utility/parse-name';

export function genComponent(_options: Schema): Rule {
  return (tree: Tree, _context: SchematicContext) => {

    // 获取到在angular cli工作区下的 路劲和要生成的组件 前缀name
    const { name, path } = getParsePath(tree, _options);

    // 读取模板文件
    const sourceTemplates = url('./files');

    // 应用模板文件
    const sourceParametrizedTemplates = apply(sourceTemplates, [
      applyTemplates({
        ..._options,
        ...strings,
        name
      }),
      move(path)
    ]);

    // 将传入的值(option)与模板文件合并(传入值替代模板变量值)
    return mergeWith(sourceParametrizedTemplates)(tree, _context);
  };
}

function getParsePath(tree: Tree, options: any): any {

  // 读取angular.json文件并存为buffer
  const workspaceConfigBuffer = tree.read("angular.json")

  // 判断是不是在一个angular-cli工作区
  if (!workspaceConfigBuffer) {
    throw new SchematicsException('不在angular cli工作区,请在angular项目中执行!')
  }

  // 读取并整理angular配置
  const workspaceConfig = JSON.parse(workspaceConfigBuffer.toString());
  // 有传入project属性或者是默认project
  const projectName = options.project || workspaceConfig.defaultProject;
  // 获取project定义
  const project = workspaceConfig.projects[projectName];

  // 获取默认project路径
  const defaultProjectPath = buildDefaultPath(project);

  // parseName()可以把路径和文件名拆开,取得path和name
  // 例如 src/feartures/login,会被拆分为 path:src/features 和 name:login
  const parsePath = parseName(defaultProjectPath, options.name);

  return parsePath;
}像上述的buildDefaultPath,parseName方法就是@schematics/angular 中提供的。
编写测试用例测试代码
这个测试方面的内容也是个大项,这里就不多说明,简单说一下我们的测试用例。
我的测试就是模拟生成一个 angular 项目,然后看看是否在里面生成了 component 的那 4 个文件,若有生成,那么通过,否则就失败。
修改 index_spec.ts 代码如下:
import * as path from 'path';

import { SchematicTestRunner, UnitTestTree } from '@angular-devkit/schematics/testing';
import { Schema as ApplicationOptions, Style } from '@schematics/angular/application/schema';
import { Schema as WorkspaceOptions } from '@schematics/angular/workspace/schema';
import { strings } from '@angular-devkit/core';

const collectionPath = path.join(__dirname, '../collection.json');

describe('component', () => {

  // 选项 --name的值
  const name = 'apple';
  const runner = new SchematicTestRunner('schematics', collectionPath);

  // 模拟ng new创建angular项目,主要对workspace和application进行配置

  // angular项目的配置
  const workspaceOptions: WorkspaceOptions = {
    name: 'workspace',              // 不重要的名字,随意取,不影响测试结果
    newProjectRoot: 'projects',     // 项目app的根目录,可以随意取,但是验证会用到
    version: '6.0.0',               // 版本号,随意,不影响测试
  };
  const appOptions: ApplicationOptions = {
    name: 'component',              // 项目名称
    inlineStyle: false,             // 以下是项目属性,随意true/false,不影响测试结果
    inlineTemplate: false,
    routing: false,
    style: Style.Css,
    skipTests: false,
    skipPackageJson: false,
  };

  // 调用 SchematicTestRunner 的 runExternalSchematicAsync 方法,并以给出的参数生成angular项目
  let appTree: UnitTestTree;

  beforeEach(async () => {
    appTree = await runner.runExternalSchematicAsync(
      '@schematics/angular',
      'workspace',
      workspaceOptions
    ).toPromise();
    appTree = await runner.runExternalSchematicAsync(
      '@schematics/angular',
      'application',
      appOptions,
      appTree
    ).toPromise();
  });


  // 最基本的判断,如果生成的文件名和预期生成的文件名一致,就验证成功
  it('works', async () => {

    // runSchematicAsync()参数:项目名、参数、Tree
    const tree = await runner.runSchematicAsync('component', { name }, appTree).toPromise();

    const dasherizeName = strings.dasherize(name);

    /* 以下其实可以直接4个toContain代替*/
    // 预期生成的文件
    const expectFiles = [
      `/projects/component/src/app/${dasherizeName}/${dasherizeName}.component.ts`,
      `/projects/component/src/app/${dasherizeName}/${dasherizeName}.component.html`,
      `/projects/component/src/app/${dasherizeName}/${dasherizeName}.component.scss`,
      `/projects/component/src/app/${dasherizeName}/${dasherizeName}.component.spec.ts`,
    ]

    // 如果实际模拟的angular项目中拥有预期生成的文件,则将它从expectFiles中移除
    for (const v of tree.files) {
      for (let i = 0; i < expectFiles.length; i++) {
        const e = expectFiles[i];
        if (v.toString() === e) {
          expectFiles.splice(i, 1);
        }
      }
    }

    //如果预期生成的文件都有生成,那么预期的应该是0=0成立
    expect(0).toEqual(expectFiles.length);
  });
});运行测试用例就很简单了,直接npm run test,如果测试成功,终端应该如下输出:
david@ubuntu:~/TTT/angular-schematics-tutorial$ npm run test

> angular-schematics-tutorial@0.0.0 test /home/david/TTT/angular-schematics-tutorial
> npm run build && jasmine src/**/*_spec.js


> angular-schematics-tutorial@0.0.0 build /home/david/TTT/angular-schematics-tutorial
> tsc -p tsconfig.json

Randomized with seed 66156
Started
.


1 spec, 0 failures
Finished in 0.369 seconds
Randomized with seed 66156 (jasmine --random=true --seed=66156)
david@ubuntu:~/TTT/angular-schematics-tutorial$
实际 angular 项目运行
测试用例通过可能很好,但最好还是去实际项目中测试一下,向生成一个 angular 项目:
ng new angular-demo在该 angular-demo 项目中运行指令angular-demo$ schematics ../angular-schematics-tutorial/src/,可以看到结果如下:
david@ubuntu:~/TTT/angular-demo$ schematics ../angular-schematics-tutorial/src/collection.json:component --debug=false
? 你想创建的component的名字: comp/apple
CREATE /src/app/comp/apple/apple.component.html (23 bytes)
CREATE /src/app/comp/apple/apple.component.scss (0 bytes)
CREATE /src/app/comp/apple/apple.component.spec.ts (755 bytes)
CREATE /src/app/comp/apple/apple.component.ts (607 bytes)
david@ubuntu:~/TTT/angular-demo$
简单说明:
其中指令 –debug=false 是为了实际生成文件,如果不加这一句,不会生成实际的文件。
因为没有直接输入--name=comp/apple或者直接comp/apple,所以出现了输入提示语。直接输入 schematics ../angular-schematics-tutorial/src/collection.json:component --name=comp/apple --debug=false则不会出现提示语。
注意:如果已有同位置同名文件,再次生成会报错,提示already exists.。
我们查看生成的 component 组件模块内容: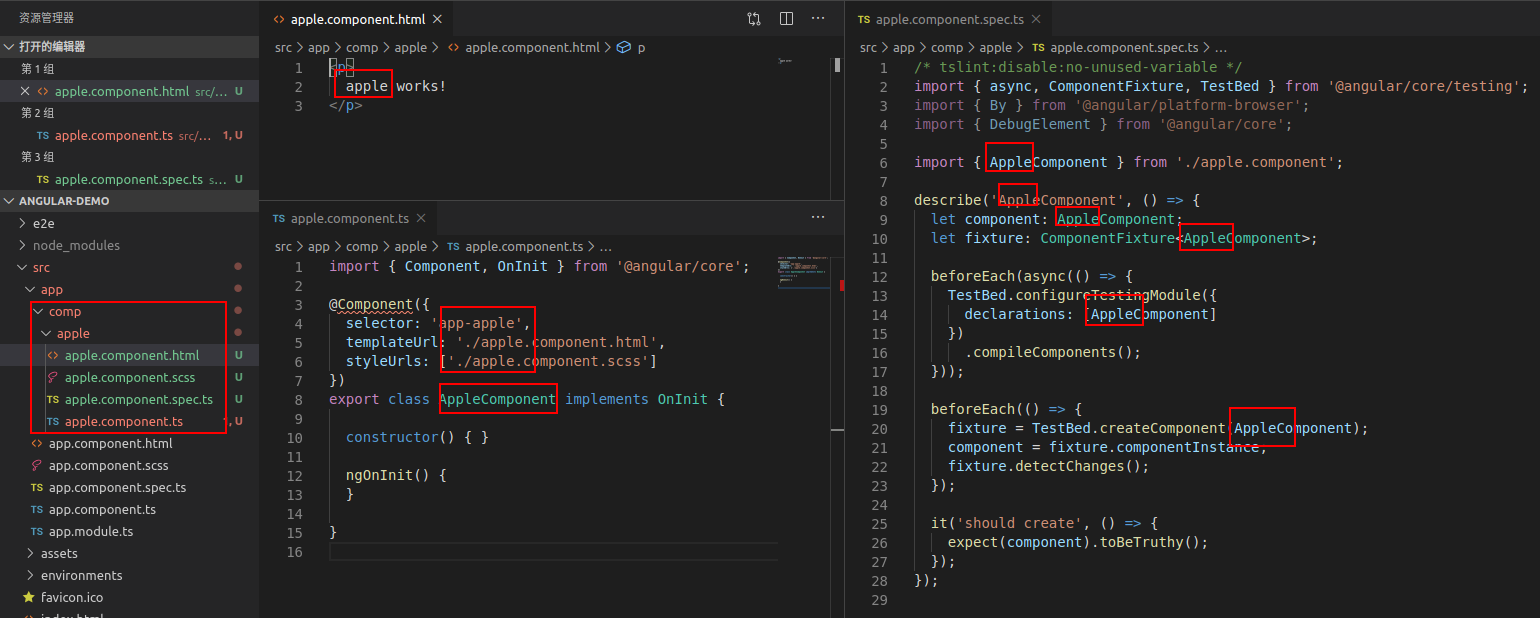
可以看到,文件有实际生成,模板内容有被替换。
恭喜,如果到这里都正确,那么已经完成了自定义原理图的制作和使用了。
所以,想要生成一个具有 CRUD 函数的 service 步骤效果就是一样的,不再赘述,具体可参看代码。
理论上,一个原理图项目(schematics)可以有很多个原理图(schematic),但是要在 collection 中统一指定配置。
总结制作原理图的一般步骤:
1、新建原理图使用模板文件;
2、创建该原理图需要的 schema.json 并将该原理图配置到 collection.json;
3、依照 schema.json 创建接口 schema.d.ts;
4、在 index.ts 中编写实现该原理图目的的逻辑代码;
5(非必须)、编写测试用例进行测试;
6(测试)、利用测试用例或实际项目进行测试。
angular schematics 实现 ng add 指令安装模块
ng add 有什么用?
将对外部库的支持添加到您的项目中。
如何使用?
ng add
[options]
但是实际上,这个能够直接使用 ng add 也是应该这个需要添加的库,内部实现了对此原理图的功能。
举个例子,众所周知,angular material 可以直接使用 ng add 添加到已有的 angular 专案。执行ng add @angular/material。
效果如下:
但是,如果我想添加 Font Awesome 到 angular 项目,你就需要
npm install @fortawesome/fontawesome-svg-core
npm install @fortawesome/free-solid-svg-icons
npm install @fortawesome/angular-fontawesome@
然后手动引入模块,声明使用等等操作。
为什么不能使用 ng add?
你看:
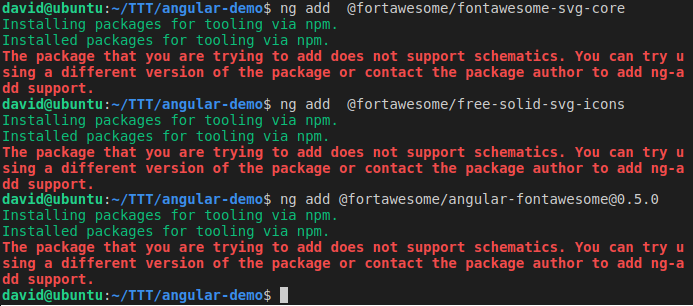
font awesome 不支持直接的 ng add,因为 package 中没有实现导入等作业,所以只执行了安装。
所以本节的目标,就是编写一个原理图,实现 ng add 的时候
1、一次性安装以上 3 个 package,
2、在 app.module.ts 中引入 FontAwesomeModule
3、在 app.component.ts 声明并在 app.component.html 实例化。
创建 ng add 的 schema.json 并配置
在与之前 component 文件夹同级的路径下,创建 ng-add 文件夹。
在 ng-add 文件夹下创建 schema.json 文件,并编写如下内容:
{
    "$schema": "http://json-schema.org/schema",
    "id": "NgAddSchema",
    "title": "Ng-Add Schema",
    "type": "object",
    "description": "给angular项目添加 Font-Awesome。",
    "properties": {
        "project": {
            "type": "string",
            "description": "给angular项目添加 Font-Awesome。"
        }
    }
}
在 collection.json 中的 “schematics”添加子项,内容如下:
"ng-add": {
  "description": "给angular项目中添加 Font-Awesome库。",
  "factory": "./ng-add",
  "schema": "./ng-add/schema.json"
}
注意名称保持 ng-add。
生成并导出 schema.d.ts 文件
schema.d.ts 文件内容大概如下:
/**
 * Ng-Add Schema
 * 给angular项目添加 Font-Awesome。
 */
export interface NgAddSchema {
    /**
     * 给angular项目添加 Font-Awesome。
     */
    project?: string;
}
编写规则工厂实现逻辑代码
在文件夹 ng-add 下新建 index.ts 文件,并写入以下代码:
import { Rule, SchematicContext, Tree, SchematicsException } from '@angular-devkit/schematics';
import { buildDefaultPath } from '@schematics/angular/utility/project';
import { NodePackageInstallTask } from '@angular-devkit/schematics/tasks';
import { NgAddSchema } from './schema';
import { addImportToModule } from '@schematics/angular/utility/ast-utils';
import { InsertChange } from '@schematics/angular/utility/change';
import * as ts from '@schematics/angular/third_party/github.com/Microsoft/TypeScript/lib/typescript';
export default function (_options: NgAddSchema): Rule {
return (_tree: Tree, _context: SchematicContext) => {
// 如果不是 Angular 项目则抛出错误
const workspaceConfigBuffer = _tree.read('angular.json');
if (!workspaceConfigBuffer) {
throw new SchematicsException('Not an Angular CLI workspace');
}
// 取得 project 的根目录
const workspaceConfig = JSON.parse(workspaceConfigBuffer.toString());
const projectName = _options.project || workspaceConfig.defaultProject;
const project = workspaceConfig.projects[projectName];
const defaultProjectPath = buildDefaultPath(project);
//将 FortAwesomeModule 加入 AppModule
const modulePath = `${defaultProjectPath}/app.module.ts`;
const sourceFile = readIntoSourceFile(_tree, modulePath);
const importPath = '@fortawesome/angular-fontawesome';
const moduleName = 'FontAwesomeModule';
const declarationChanges = addImportToModule(sourceFile, modulePath, moduleName, importPath);
const declarationRecorder = _tree.beginUpdate(modulePath);
for (const change of declarationChanges) {
if (change instanceof InsertChange) {
declarationRecorder.insertLeft(change.pos, change.toAdd);
}
}
_tree.commitUpdate(declarationRecorder);
// 将某个 icon 引入到 app.component.ts,再到 app.component.html 中使用它。(声明并实例化)
// 获取 app.component.ts 的 AST
const componentPath = `${defaultProjectPath}/app.component.ts`;
const componentSourceFile = readIntoSourceFile(_tree, componentPath);
// 取得所有的 ImpotDeclaration
const allImports = componentSourceFile.statements.filter(node => ts.isImportDeclaration(node))! as ts.ImportDeclaration[];
// 找到最后一个 ImpotDeclaration
let lastImport: ts.Node | undefined;
for (const importNode of allImports) {
if (!lastImport || importNode.getStart() > lastImport.getStart()) {
lastImport = importNode;
}
}
// 找到 ClassDeclaration
const classDeclaration = componentSourceFile.statements.find(node => ts.isClassDeclaration(node))! as ts.ClassDeclaration;
// 取得所有的 property
const allProperties = classDeclaration.members.filter(node => ts.isPropertyDeclaration(node))! as ts.PropertyDeclaration[];
// 取得最后一个 propery
let lastProperty: ts.Node | undefined;
for (const propertyNode of allProperties) {
if (!lastProperty || propertyNode.getStart() > propertyNode.getStart()) {
lastProperty = propertyNode;
}
}
const componentRecorder = _tree.beginUpdate(componentPath);
const importFaCoffee = '\nimport { faCoffee } from \'@fortawesome/free-solid-svg-icons\';';
componentRecorder.insertLeft(lastImport!.end, importFaCoffee);
// 添加声明部分的代码
const faCoffeeProperty = 'faCoffee = faCoffee;'
const changeText = lastProperty ? lastProperty.getFullText() : '';
let toInsert = '';
if (changeText.match(/^\r?\r?\n/)) {
toInsert = `${changeText.match(/^\r?\n\s*/)![0]}${faCoffeeProperty}`;
} else {
toInsert = `\n ${faCoffeeProperty}\n`;
}
// 插入字串
if (lastProperty) {
componentRecorder.insertLeft(lastProperty!.end, toInsert);
} else {
componentRecorder.insertLeft(classDeclaration.end - 1, toInsert);
}
_tree.commitUpdate(componentRecorder);
//在 app.component.html 里面加上 代码不用细读,大约做了以下几件事:
1、判断是不是 angular 项目
2、获取 angular.json 中参数配置
3、在 app.module.ts 中引入 FontAwesomeModule
4、在 app.component.ts 声明一个 Font
5、在 app.component.html 实例化。
6、修改模板项目 package.json 依赖列表,加入那 3 个库;
7、实现那 3 个库的安装。
……
测试并使用
如果需要写测试用例,那么可以 ng-add 文件夹下添加 index_spec.ts 并写代码(可参看源码)
直接在 angular 项目中实践: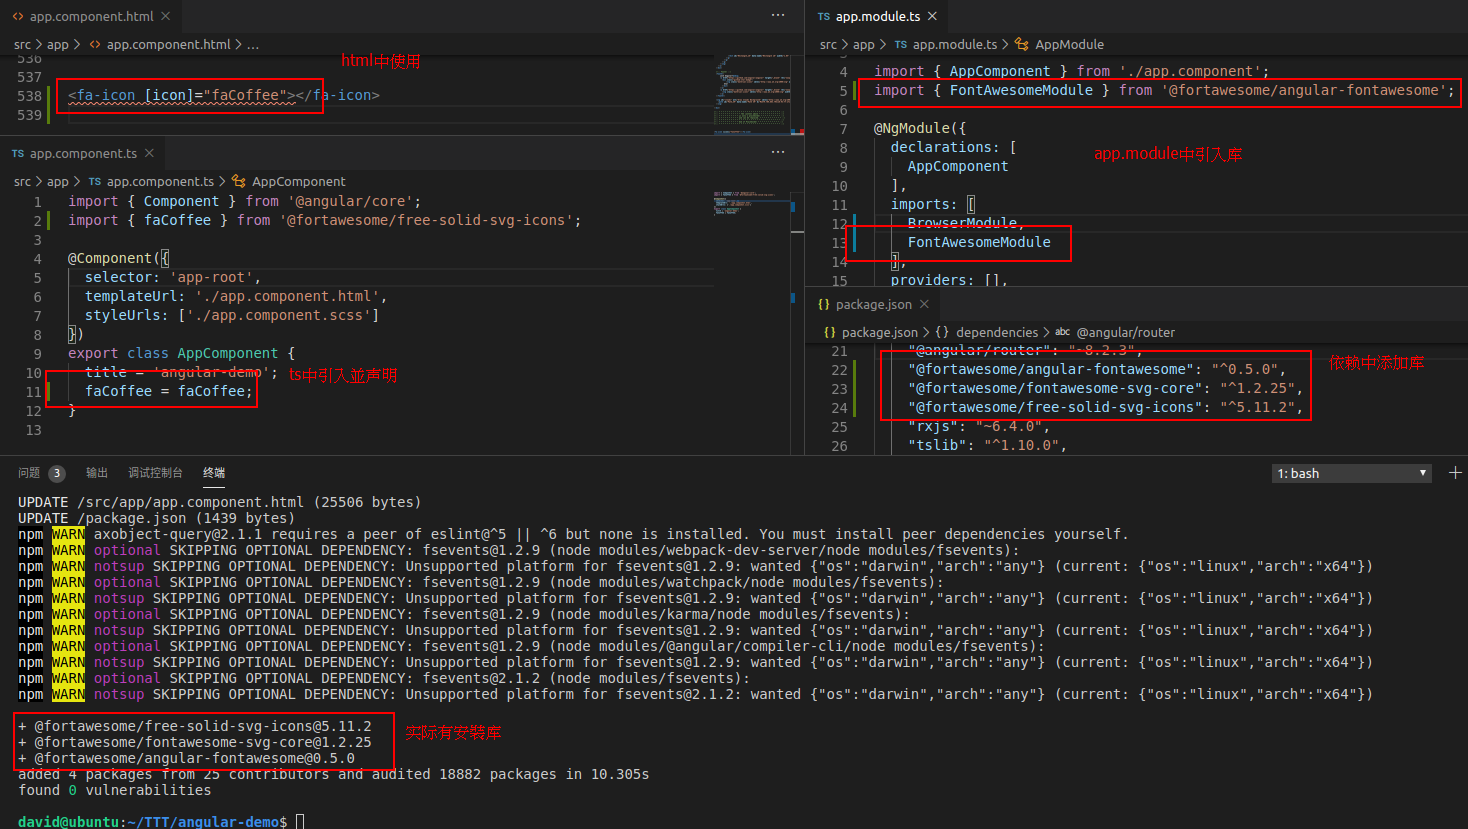
如果到这里都正常,那么恭喜你,自定义原理库实现 ng add 也成功了!
angular schematics 实现 ng update 更新模块时修改指定组件内容
上面 2 节分别实现了 ng generator 和 ng add,那么接下来就是 ng update 了。
关于 angular schematics 自定义 ng update 的实践目前网上找的示例都比较少,还不是很清晰。我们这里也会做个实例,但是不会深究。
ng update 有什么用?
更新您的应用程序及其依赖项。
如何使用?
ng update [options]
一般的,如果你的 angular 项目是老旧版本的,运行ng update指令,可能就会出现类似以下的内容:
Using package manager: 'npm'
Collecting installed dependencies...
Found 33 dependencies.
    We analyzed your package.json, there are some packages to update:

      Name                               Version                  Command to update
     --------------------------------------------------------------------------------
      @angular/cdk                       8.1.4 -> 8.2.3           ng update @angular/cdk
      @angular/cli                       8.3.0 -> 8.3.20          ng update @angular/cli
      @angular/core                      8.2.3 -> 8.2.14          ng update @angular/core
      @angular/material                  8.1.4 -> 8.2.3           ng update @angular/material
      rxjs                               6.4.0 -> 6.5.3           ng update rxjs
大家可以仔细看看,这份分析结果说明了什么?
一共有 33 个依赖,但是只有 5 个可以使用 ng update 升级?
从哪里看出哪些依赖能用 ng update 升级?各个依赖包的 package.json
ug update 的原理逻辑还是比较复杂了,其实直接看 angular-cli 的升级,比较容易看出端倪。
访问https://github.com/angular/angular-cli/tree/master/packages/schematics/angular/migrations,
查看 migration-collection.json 文件,随意选一个,例如以下:
// 上略
   "migration-07": {
      "version": "8.0.0-beta.12",
      "factory": "./update-8",
      "description": "Update an Angular CLI project to version 8."
    },
// 下略
看起来大概意思就是,ug update 将 angular 升级到 8.0.0-beta.12 版本时,就会执行migration-07的升级相关命令,其工厂函数内容就在 update-8 的文件夹中。
有兴致可以细研究 ng update 到 8.0.0-beta.12 具体做了什么。我们只需要简单知道migration-07他会依照相关规则去执行一些动作。
那么,这份migration-collection.json是在哪里使用的呢?
可以看到,在这里:https://github.com/angular/angular-cli/blob/master/packages/angular/cli/package.json,在 angular-cli 的 package.json 文件中被定义的。
以上只是一些我在知道结果之后抛出来给大家看的关键点,大家可以深入研究。我在这里,就简单写个示例,供分析。
注意:为了后续 ng update 实际使用效果,在此时进行后续作业前,可将现在的代码备份一下,作为 0.0.1 版本。 版本号的更改当然在 package.json 中。
本节需要实现的目标是:
1、本 angular-schematics-tutorial package 在 angular 项目中使用时,可以使用 ng update 进行升级
2、在升级到指定版本时,能够按照升级需求修改已有 angular 项目中部分规则内容。
这也是在使用 ng update 升级 angular 项目时,可以看到很多旧版本的写法,他会自动纠正成新版本的写法。
不过,依照我的简单总结,使用 ng update 升级,其实有几点要做:
创建 migration.json 文件
在 src/文件夹下,与 collection.json 同级目录,新建 migration.json 文件(名字虽然不限制,但是以便识别),并写入以下内容:
{
    "$schema": "../node_modules/@angular-devkit/schematics/collection-schema.json",
    "schematics": {
        "migration002": {
            "version": "0.0.2",
            "description": "更新angular-schematics-tutorial到0.0.2版本时执行的更新",
            "factory": "./ng-update/index#update"
        }
    }
}
此份说明,当后续把这个 schematics 项目打包之后,其他 angular 项目中使用了这个包,升级到 0.0.2 版本时,就要执行在/ng-update/index.ts 文件中的逻辑规则更新代码了。
在 package.json 中声明 ug-update 配置
在 package.json 中,添加以下项目:
  "ng-update": {
    "migrations": "./src/migration.json"
  },
其作用,就是在执行 ng update 时,能够找到对应的配置文件
编写更新执行的规则工厂逻辑代码
因为只是简单示例,我简单的实现,如果把此 angular-schematics-tutorial 包升级到了 0.0.2 版本,那么一并更新 app.component.ts 里面的 title 变量的值,为AngularSchematicsTutorial002,如果在我之前使用的测试 angular-demo 中运行,可以先看到,目前的 title 值应该是title = 'angular-demo';。
在 component 同级文件夹路径下新建 ng-update 文件夹,并添加 index.ts 文件,并添加以下代码:
import { Rule, Tree, SchematicContext, SchematicsException } from '@angular-devkit/schematics';
import { buildDefaultPath } from '@schematics/angular/utility/project';
import * as ts from 'typescript';

export function update(): Rule {
    return (_tree: Tree, _context: SchematicContext) => {

        // 解析angular项目
        const workspaceConfigBuffer = _tree.read('angular.json');
        if (!workspaceConfigBuffer) {
            throw new SchematicsException('Not an Angular CLI workspace');
        }

        const workspaceConfig = JSON.parse(workspaceConfigBuffer.toString());
        const projectName = workspaceConfig.defaultProject;
        const project = workspaceConfig.projects[projectName];
        const defaultProjectPath = buildDefaultPath(project);

        // 把 app.component.ts 转成 Typescript AST
        const componentPath = `${defaultProjectPath}/app.component.ts`;
        const componentSourceFile = readIntoSourceFile(_tree, componentPath);

        // 找出 title 变量
        const classDeclaration = componentSourceFile.statements.find(node => ts.isClassDeclaration(node))! as ts.ClassDeclaration;
        const allProperties = classDeclaration.members.filter(node => ts.isPropertyDeclaration(node))! as ts.PropertyDeclaration[];
        const titleProperty = allProperties.find(node => node.name.getText() === 'title');

        // 如果有找到 title 变量,则修改它的值
        if (titleProperty) {
            const initialLiteral = titleProperty.initializer as ts.StringLiteral;

            const componentRecorder = _tree.beginUpdate(componentPath);
            const startPos = initialLiteral.getStart();
            componentRecorder.remove(startPos, initialLiteral.getWidth());
            componentRecorder.insertRight(startPos, '\'AngularSchematicsTutorial002\'');

            _tree.commitUpdate(componentRecorder);
        }

        return _tree;
    }
}

function readIntoSourceFile(host: Tree, modulePath: string): ts.SourceFile {
    const text = host.read(modulePath);
    if (text === null) {
        throw new SchematicsException(`File ${modulePath} does not exist.`);
    }
    const sourceText = text.toString('utf-8');
    return ts.createSourceFile(modulePath, sourceText, ts.ScriptTarget.Latest, true);
}
内容可不细看,就是找到 angular 项目中的 app.component.ts,把 title 的值改为 AngularSchematicsTutorial002。
测试并使用
当然,再次在 ng-update/index.ts 下创建 index_spec.ts 编写测试用例也是 ok 的,源代码中会给出。
若不用这个麻烦,可以直接在之前的 angular-demo 专案的测试,不过因为是相对路径,则不能直接使用 ng update 了,因为它不知道去哪里判断是不是新版本的更新。
在 angular-demo 中运行:
schematics ../angular-schematics-tutorial/src/migration.json:migration002 --debug=false执行之后,应该会得到以下结果:
david@ubuntu:~/TTT/angular-demo$ schematics ../angular-schematics-tutorial/src/migration.json:migration002 --debug=false
UPDATE /src/app/app.component.ts (318 bytes)
david@ubuntu:~/TTT/angular-demo$
并且,app.component.ts 中title = 'angular-demo';变成了title = 'AngularSchematicsTutorial002';
如果能够运行成功,说明 angular schematics 构建 ng update 原理图也学习完成。
将原理图 package 发布并使用
以上在执行时,都是使用相对路径在项目中运行,一点都不专业?那么我们可以把这个 schematics 工具包发布,后续直接使用 ng 指令运行。
使用 npm link 本地调试
可以在我们的 angular-schematics-tutorial 项目目录下,运行npm link指令。
npm link 指令细节可参看https://docs.npmjs.com/cli/link.html
。主要作用就是创建一个全局可访问链接符号。
执行之后得到的效果应该如下:
david@ubuntu:~/TTT/angular-schematics-tutorial$ npm link
npm WARN angular-schematics-tutorial@0.0.2 No repository field.

audited 78 packages in 1.031s
found 0 vulnerabilities

/home/david/.nvm/versions/node/v12.6.0/lib/node_modules/angular-schematics-tutorial -> /home/david/TTT/angular-schematics-tutorial
david@ubuntu:~/TTT/angular-schematics-tutorial$
然后在模板 angular 项目中,链接刚刚的全局 angular-schematics-tutorial 链接。npm link angular-schematics-tutorial,相当于在当前项目安装了之前 link 的包,然后就可以在 angular 项目中直接使用 ng g
例如在 angular-demo 项目中 link angular-schematics-tutorial ,应该如下:
david@ubuntu:~/TTT/angular-demo$ npm link angular-schematics-tutorial
/home/david/TTT/angular-demo/node_modules/angular-schematics-tutorial -> /home/david/.nvm/versions/node/v12.6.0/lib/node_modules/angular-schematics-tutorial -> /home/david/TTT/angular-schematics-tutorial
david@ubuntu:~/TTT/angular-demo$
然后使用 ng generator:
david@ubuntu:~/TTT/angular-demo$ ng g angular-schematics-tutorial:component
? 你想创建的component的名字: comp/pie
CREATE src/app/comp/pie/pie.component.html (21 bytes)
CREATE src/app/comp/pie/pie.component.scss (0 bytes)
CREATE src/app/comp/pie/pie.component.spec.ts (741 bytes)
CREATE src/app/comp/pie/pie.component.ts (259 bytes)
david@ubuntu:~/TTT/angular-demo$
注意:现在不用设置 –debug=false 属性,一样会直接真实创建了。
同理,使用 ng add angular-schematics-tutorial:
david@ubuntu:~/TTT/angular-demo$ ng add angular-schematics-tutorial
Skipping installation: Package already installed
UPDATE src/app/app.module.ts (407 bytes)
UPDATE src/app/app.component.ts (302 bytes)
UPDATE src/app/app.component.html (25506 bytes)
UPDATE package.json (1439 bytes)
npm WARN axobject-query@2.1.1 requires a peer of eslint@^5 || ^6 but none is installed. You must install peer dependencies yourself.
……
省略了一些npm WARN
……
npm WARN notsup SKIPPING OPTIONAL DEPENDENCY: Unsupported platform for fsevents@2.1.2: wanted {"os":"darwin","arch":"any"} (current: {"os":"linux","arch":"x64"})

+ @fortawesome/free-solid-svg-icons@5.11.2
+ @fortawesome/fontawesome-svg-core@1.2.25
+ @fortawesome/angular-fontawesome@0.5.0
added 4 packages from 25 contributors, removed 1 package and audited 18882 packages in 11.067s
found 0 vulnerabilities

david@ubuntu:~/TTT/angular-demo$
注意:如果之前执行过,最好撤销后再试。
看到上面显示这一句Skipping installation: Package already installed,这里 already installed 的 package 指的是 angular-schematics-tutorial,原因在于我们使用 npm link angular-schematics-tutorial 已经做了链接了。
那么,能否直接测试 ng update 呢?目前我是没有成功的。 因为 npm link 无法同时测试两个版本?这点可请大家指出。
注意,测试完了请使用 npm unlink 去清除那些链接,避免混乱等情况。
将原理图 package 发布到仓库并使用
写在前面:如果觉得这样的糟粕不想自己发布用于测试,可以直接使用我已发布的进行测试。
先安装 0.0.1 版本:npm i angular-schematics-tutorial@0.0.1
然后执行ng update,查看是否生效。
一般如果公司有自己内部的包管理系统,那么就可以直接发布到内部去。
如何搭建私有 npm 仓库?我之前有文件,使用 verdaccio。
我们这里示例将包发布到公网的 npmjs.com 去。既然是 npmjs,那可能你要去注册个帐号了。
记得前面我们有备份一个 0.0.1 版本的 angular-schematics-tutorial 吗?我们先来发布它。
添加帐号,在终端输入 adduser,按提示填写
david@ubuntu:~/TTT/angular-schematics-tutorial$ npm adduser
Username: davidsu
Password:
Email: (this IS public) 183318××××@qq.com
Logged in as davidsu on https://registry.npmjs.org/.
david@ubuntu:~/TTT/angular-schematics-tutorial$
logged in 表示成功
在根目录执行npm publish
得到结果如下:
david@ubuntu:~/TTT/angular-schematics-tutorial$ npm publish
npm notice
npm notice 📦  angular-schematics-tutorial@0.0.1
npm notice === Tarball Contents ===
……
略一大部分 npm notice 内容
……
npm notice === Tarball Details ===
npm notice name:          angular-schematics-tutorial
npm notice version:       0.0.1
npm notice package size:  11.3 kB
npm notice unpacked size: 41.2 kB
npm notice shasum:        9f80b36542065cafb2eb06a5eceb068d5aa9db44
npm notice integrity:     sha512-oZcVhqatHlU9K[...]Qz7Deicn1f3oA==
npm notice total files:   34
npm notice
+ angular-schematics-tutorial@0.0.1
david@ubuntu:~/TTT/angular-schematics-tutorial$
那么没有添加 ng update 的 0.0.1 版本就发布了,可以在 npmjs 网站自己的账户下查看自己发布的包。
发布 0.0.2 版本的包
重复以上动作(npm publish),把 angular-schematics-tutorial 的 0.0.2 版本的包也发布了,那么就可以看到自己两个版本的包了。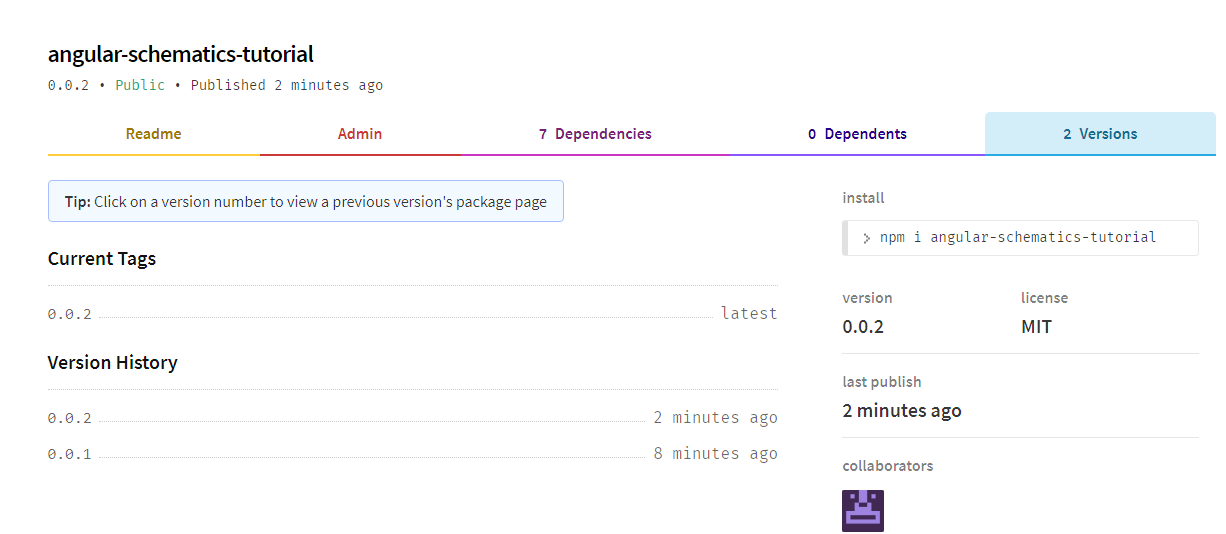
实际测试使用
现在,我们的 angular-schematics-tutorial 就是一个可以被所有人访问的原理图工具包了,那么我们就可以像实际使用包一样去测试它了。
为了避免干扰,可以删除之前的 angular-demo 测试项目,新建一个 angular-test 的新项目
ng new angular-test我们先测试 ug update 的效果。
先安装 0.0.1 版本:
npm i angular-schematics-tutorial@0.0.1然后运行ng update指令,应该看到以下内容
david@ubuntu:~/TTT/angular-test$ ng update
Using package manager: 'npm'
Collecting installed dependencies...
Found 31 dependencies.
    We analyzed your package.json, there are some packages to update:

      Name                               Version                  Command to update
     --------------------------------------------------------------------------------
      angular-schematics-tutorial        0.0.1 -> 0.0.2           ng update angular-schematics-tutorial
      rxjs                               6.4.0 -> 6.5.3           ng update rxjs
david@ubuntu:~/TTT/angular-test$
现在,我们可以直接使用 ng update 去升级我们的工具包了。
注意:使用 ng update 升级前,要提交所有变更。
运行ng update angular-schematics-tutorial,注意查看 app.component.ts 中 title 变量是否变化:
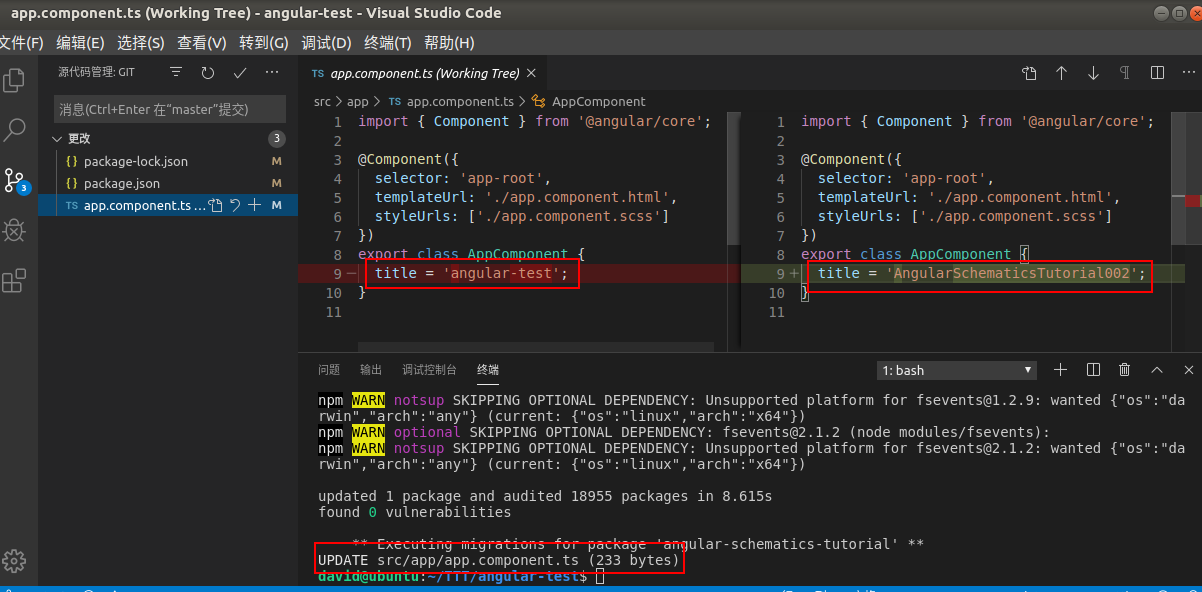
david@ubuntu:~/TTT/angular-test$ ng update angular-schematics-tutorial
Using package manager: 'npm'
Collecting installed dependencies...
Found 31 dependencies.
Fetching dependency metadata from registry...
    Updating package.json with dependency angular-schematics-tutorial @ "0.0.2" (was "0.0.1")...
UPDATE package.json (1329 bytes)
npm WARN axobject-query@2.1.1 requires a peer of eslint@^5 || ^6 but none is installed. You must install peer
……
省略一些npm WARN
……
npm WARN notsup SKIPPING OPTIONAL DEPENDENCY: Unsupported platform for fsevents@2.1.2: wanted {"os":"darwin","arch":"any"} (current: {"os":"linux","arch":"x64"})

updated 1 package and audited 18955 packages in 8.615s
found 0 vulnerabilities

    ** Executing migrations for package 'angular-schematics-tutorial' **
UPDATE src/app/app.component.ts (233 bytes)
david@ubuntu:~/TTT/angular-test$
从最后一行,看到,应该是修改了,实际也如此。
其他的 ng generator 的原理图和 ng add 的原理图也是可以的,可以自行测试。
例如:ng g angular-schematics-tutorial:crudService或者ng add angular-schematics-tutorial
总结
花费了如此大量的篇幅,基本上讲清楚了 angular schematics 的基本使用内容。虽然看起来很鸡肋,但是如果是 angular 技术栈并且长期有重复大量相同工作的开发,不免可以试一下使用它来重构下作业流程。虽然不一定比 ctrl+c ctrl+v 快,但是至少逼格更高了。
总结一下使用 angular schematics 的步骤重点。
制作 ng generator 或 ng add 原理图:
1、新建原理图使用模板文件;
2、创建该原理图需要的 schema.json 并将该原理图配置到 collection.json;
3、依照 schema.json 创建接口 schema.d.ts;
4、在 index.ts 中编写实现该原理图目的的逻辑代码;
5(非必须)、编写测试用例进行测试;
6(测试)、利用测试用例或实际项目进行测试。
添加 ng update
1、创建并编写 migration.json 文件;
2、在 package.json 中声明 ug-update 配置;
3、编写更新执行的规则工厂逻辑代码;
4、测试并使用。
以上内容亲测有效,有问题可提出交流,谢谢。
主要参考:
https://ithelp.ithome.com.tw/articles/10222826
https://medium.com/@tomastrajan/total-guide-to-custom-angular-schematics-5c50cf90cdb4
和 angular 官方文档:https://angular.cn/guide/schematics